Sensitive data discovery with Delphix - Legacy
This section describes a solution template you can use to identify sensitive data columns from any data source using the Delphix Continuous Compliance Engine. For a high-level overview, refer to the Azure Architecture Center documentation.
Prerequisites
Azure subscription
If you don’t have an Azure subscription, create a free Azure account before you begin.Delphix Continuous Compliance Engine
You must purchase a Delphix Continuous Compliance Engine. If you don’t have a Delphix Continuous Compliance Engine, create a Delphix Continuous Compliance Engine in Azure and register your engine. Refer to Azure Installation for more details on installing and configuring a Delphix Continuous Compliance Engine in Azure.Logic app for fileformat upload
Make sure that the Azure subscription supports the creation of consumption plan-based logic app resources. The following are the steps for generating a logic app for fileformat upload:Deploy to Azure. This step redirects to the custom deployment form for the logic app.
Select the resource group, region, and workflow name. Click review & create.
Once the logic app is generated and deployed, the URL can be retrieved from the step When an HTTP request is received. Click the Designer section to view the steps of the Logic App.
[Required] Copy the URL for the logic app from the value of the field HTTP POST URL. This URL is used as an input parameter for the Sensitive Data Discovery with Delphix - Legacy pipeline.
Azure Key Vault
Username & Password to login into the Delphix Continuous Compliance Engine should be present in the Azure Key Vault. Adequate permissions must be provided to access both the username and password information.Source dataset
A source dataset containing unmasked data that can be connected from the ADF pipelines.Storage account
A storage account with containers, a fileshare, and permissions to create the directories.FileShare
A FileShare to host the extracted source csv files and the masked target csv files that is required for the RuleSet creation. Ruleset creation will serve as a pre-requisite for Delphix’s Masking Job.Linked Service(s)
Linked Service to connect to source dataset, fileshare, and intermediate containers.Container and FileShare root folders
A dedicated container and a folder in the file share for processing. The values for these would be needed in the ContainerRootFolder and FileShareRootFolder parameters respectively.
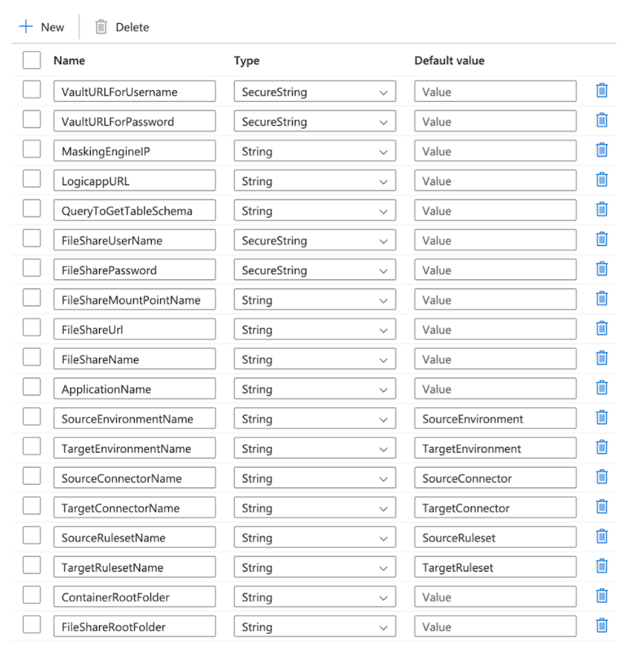
Input parameters
This template requires the following input parameters:
VaultURLForUsername
Key Vault URL to fetch the Delphix Continuous Compliance Engine username. The URL is structured as{VaultBaseURL}/secrets/{secret-name}?api-version={keyVaultVersion}.VaultURLForPassword
Key Vault URL to fetch the Delphix Continuous Compliance Engine password. The URL is structured as{VaultBaseURL}/secrets/{secret-name}?api-version={keyVaultVersion}.MaskingEngineIP
IP of the Delphix Continuous Compliance Engine.LogicappURL
The URL to access the logic app deployed above.QueryToGetTableSchema
Query to fetch schema name and table name from the source database. This query fetches schema name and table name for all tables that are required in the target data source. The query given in the below example can be modified based on the source database.Example:
SELECT TABLE_SCHEMA,TABLE_NAME FROM INFORMATION_SCHEMA.TABLES WHERE TABLE_SCHEMA = '{source schema}’
FileShareUserName
Key Vault URL to fetch the username for the file share. It would be needed to mount the file share on the Delphix Engine (usually your storage account name).FileSharePassword
Key Vault URL to fetch the password for the file share. It would be needed to mount the file share on the Delphix Engine.FileShareMountPointName
Name of the mount point that would appear on the Delphix Engine.FileShareUrl
Connection URL/host address for your storage account.FileShareName
Name of the file share that you want to mount.ApplicationName
Application name for setting up profiling.SourceEnvironmentName
Name of the source environment.TargetEnvironmentName
Name of the target environment.SourceConnectorName
Name of the source connector.TargetConnectorName
Name of the target connector.SourceRulesetName
Name of the source rulesetTargetRulesetName
Name of the target ruleset.ContainerRootFolder
Name of the container where the masked data and file formats would be stored.FileShareRootFolder
Name of the root folder in the file share that would be used to store unmasked and masked data.
For more information, refer to the Delphix Engine Terminologies.
For different source environments or engine, it is recommended to use different root folders to maintain consistency of the uploaded file formats.
Host address of your storage account usually has the following pattern:
<Storage Account name>.file.core.windows.net.To find the username or password of the file share, refer to Step 7 in the above steps. To view the script, click the Show Script button. The username and password information can be found in the script.
About this Template
This template extracts the schema information for all tables from the source dataset, converts the schema into a format required by the Delphix Continuous Compliance Engine, and uploads the schema information into the Delphix Continuous Compliance Engine. This schema information is used by the Delphix Continuous Compliance engine to identify and flag sensitive data columns a.k.a Profiling.
The Source dataset must be a supported database in Azure.
The template contains the following activities:
Lookup activityretrieves the name of all the tables that are present in the source database with respect to the input schema and passes them to subsequent ForEach activity.Get Metadata activitychecks if schemafile directory was already created.If activitycleans up the schemafile directory if created.ForEach activitygets the table name from the Lookup activity and iterates each table to fetch the header (column) information and store the same into a file. These will be created within the schemafile directory within a container. One file is created for each table. The name of the file will be{SCHEMA_NAME}.{TABLE_NAME}.csv. This ForEach activity will also be used to create empty files with the same name as mentioned above within the target directory of the Fileshare. These files are required to set up the masking Job on the Delphix Continuous Compliance Engine.Execute Pipeline activitysets up the folder structure required for the processing of the pipeline.Get Metadata activitygets the list of all the files that were created within the schemafile directory.ForEach activityscans all the files created within the schemafile directory and processes the file content into the desired format and writes the same into the fileformat directory.Get Metadata activityto get all the files that need to be uploaded in the current execution.Get Metadata activityto get all the files that were uploaded in the previous executions.Filter activity to get all the files that were previously not uploaded or fresh files.
ForEach activityappends the above files in an array.Filter activityto list all previously uploaded files that are being uploaded in this execution as well.ForEach activity checks if all filtered files in the above filter are fit to be uploaded.
Web activityto fetch the username from Azure Key Vault to login into the Delphix Continuous Compliance Engine.Web activityto fetch the password from Azure Key Vault to login into the Delphix Continuous Compliance Engine.Web activitylogins into the Delphix Continuous Compliance Engine using the credentials that are retrieved from Azure Key Vault.Execute pipeline activityruns setup on the provided Delphix Engine. This activity does the following activities based on the parameters provided:Creates an application.
Creates the source and target Environment.
Mounts the file share and creates a mount point based on the parameter name.
Creates the source and target connectors for the above mount point.
Creates a dummy ruleset for the source and target environment.
ForEach activityiterates over all the processed files, append the filename with a subset of pipeline run id to make the filename unique, and uploads the same to the Delphix Continuous Compliance Engine. The name of the files uploaded will appear as follows:{SCHEMA_NAME}.{TABLE_NAME}.csv_{pipeline run ID}.This upload will be done with the help of the Logic app that you must install as a part of the prerequisites. This also cleans up the fileformat for tables where table schema has changed given the older uploaded fileformat is no longer linked to the file(table).
How to Use This Template
Go to the template gallery.
Select the Sensitive Data Discovery with Delphix - Legacy template.
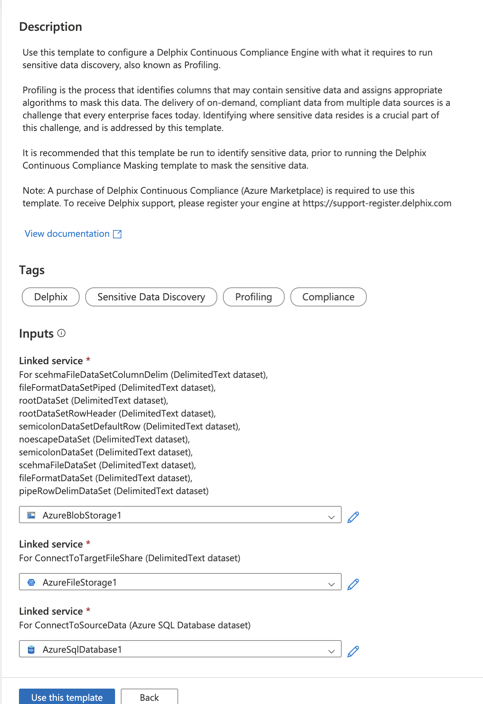
Select the Linked Service to connect to the Azure blob storage. It is required to create the intermediate containers. If no service is available, click on + New and add the Linked Service.
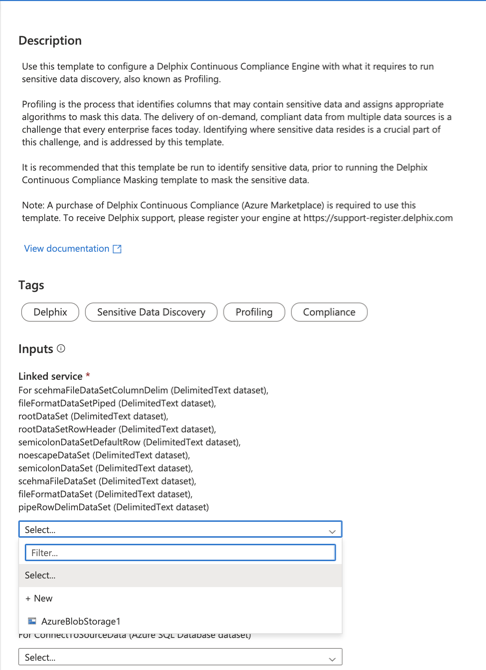
Select the Linked service for the Azure fileshare. If no service is available, click on + New and add the Linked Service.
.png?inst-v=56ca5b98-8575-40fc-9e55-799c2c6411c5)
Select the Linked Service to connect to the source database from the dropdown. If no service is available, click on + New and add the Linked Service.
.png?inst-v=56ca5b98-8575-40fc-9e55-799c2c6411c5)
Click Use this template. This step creates a pipeline in your data factory.
Click Debug to start the pipeline. You must provide the input parameters to proceed further.
After you run the template, complete the Profiling and Inventory review (confirming that you are satisfied with the sensitive data discovered by Delphix), before using the masking template. For more details on the Inventory, refer to The Inventory Screen section in the Continuous Compliance documentation.
When you are selecting a file format during Ruleset creation in the Delphix Continuous Compliance Engine, you may see multiple file formats for the same file. It is because of the creation of a new file format upon each Sensitive Data Discovery with Delphix - Legacy pipeline run. The name of the file format is of the form
[SCHEMA-NAME].[TABLE-NAME].csv_[first 8 characters of pipelineRunID]. You must select the file format corresponding to thepipelineRunId.When linking a file format to a file, use
CR+LF (Windows/DOS)as the end of line character.